Links to Booth.Events in this post are my referral link. The Amazon links are the exact items I use.
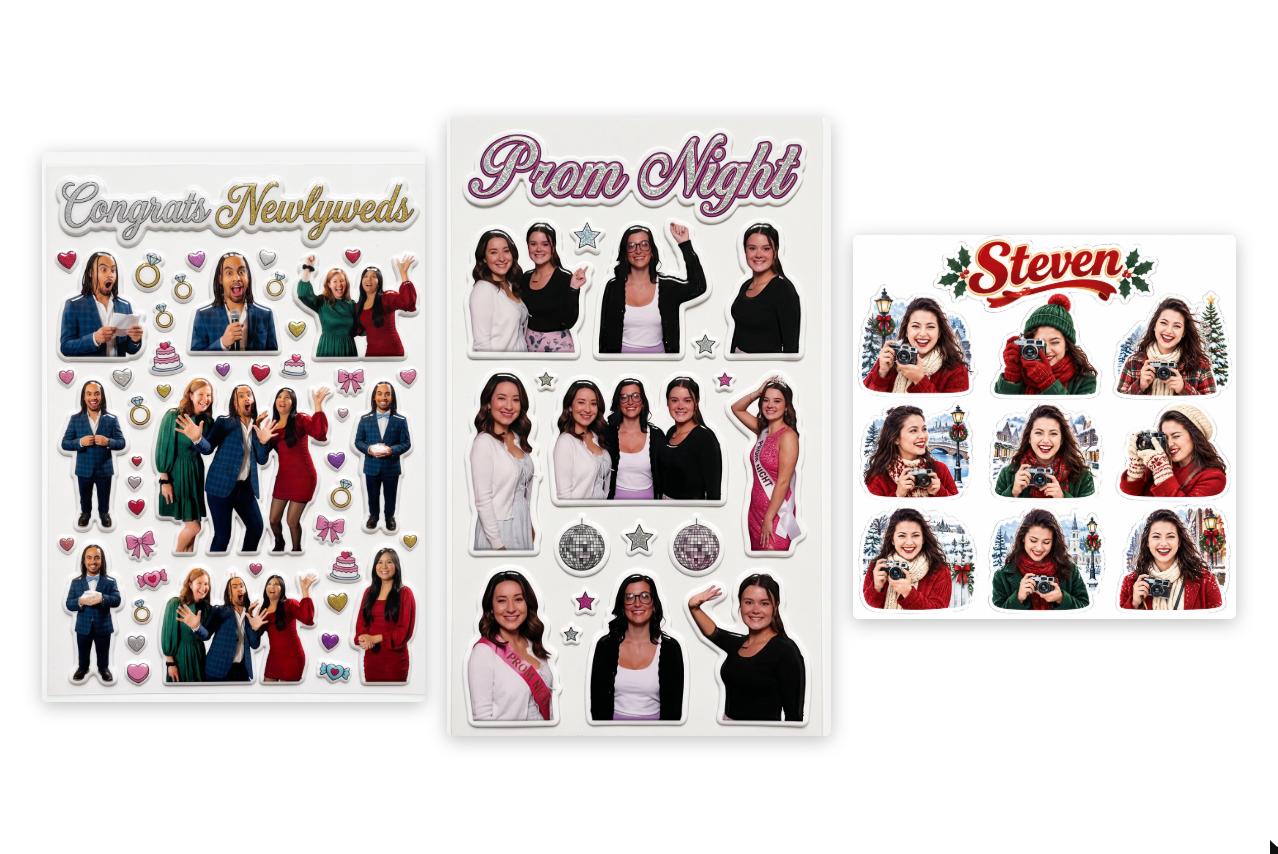
Live photo stickers have become the most-asked-about thing in my booth. Guests pose, and about two minutes later they're peeling a die-cut sheet of themselves as 90s puff stickers. Since I started running stickers with Booth.Events and the Liene PixCut S1, I keep getting the same questions from other operators in the Booth.Events Community group and in my DMs: what hub, what cables, how do you run two printers, and what prompt are you using?
So here's all of it in one place: my recommended gear, how it's wired, the Booth.Events settings, and the workflow I use at real events. Every time someone asks me a question, this post gets a little better, so keep them coming.
Recommended items
The sticker printer
- Liene PixCut S1: prints and cuts the sticker sheet in one pass. It's the only sticker printer Booth.Events supports for peel-and-stick activations (app version 1.59.1 or newer).
- Sticker paper and ink: Liene Sticker Paper & Cartridge (Enhanced Adhesion Version), 72 sheets of 4x7" sticker paper plus 2 ink cartridges. This is the PixCut-only media I use.
The iPad (or Mac)
- iPad with an M-series chip (M1 or newer: 2021 iPad Pro or newer, or the 2022 iPad Air 5th gen and newer), running iPadOS 18.4 or newer, with iPadOS 26 recommended.
- A-series iPads won't work. The 10th gen iPad and the A16 iPad can't do direct USB printing because of an Apple limitation. That's the first thing to check if your printer never shows up.
- Mac works too: macOS 14.2 Sonoma or newer, Apple silicon or Intel. Download the Mac app from the Booth.Events website, because the App Store version can't print over USB.
Dock, hub and cable (the part everyone asks about)
- iPad dock: dockteck 7-in-1 USB-C Hub with 100W power passthrough.
- Powered USB hub: StarTech 7-Port USB 2.0 Hub (ST7202USB), externally powered.
- Long USB cable: Amazon Basics USB-A to USB-B 2.0 cable, 16 ft, which runs from the dock to the hub on the printer table.
- Power: Booth.Events says to use an AC adapter of at least 45W on the dock, and 60W or more is better (especially with HiTi printers).
- Backups: Keep a second of every electronic and electrical item in the booth. Hubs, cables and power bricks are cheap compared to a dead booth mid-event.
Optional: a regular dye-sub printer
You can run a normal printer at the same event alongside the sticker printer. Supported direct-USB printers include the DNP DS620A, RX1, RX1HS, DS40 and QW-410, the Citizen CX-02, CY and CZ-01, and the HiTi P525L / SwiftColor SCC-3000. Canon Selphy, Epson and Mitsubishi printers aren't supported over USB, though a Selphy can still print through AirPrint.
How it's wired: dock vs. hub
This is where most people get tangled up, so here's the simple version:
- Dock = one port to many different kinds of ports and connections (power, USB-A, HDMI, card reader).
- Hub = one port to many of the same kind of port (lots of USB-A).
My setup:
- The iPad plugs into the dock, and the dock gets the power supply that charges the iPad.
- Your DSLR or mirrorless camera plugs into one of the dock's ports.
- A 16 ft USB cable goes from another dock port to the powered USB hub on the printer table. The hub has its own power supply.
- All the printers plug into the hub: PixCut sticker printers, plus a dye-sub printer if you're running one.
- The dock's third port stays empty as a spare, in case a port gets physically damaged.
Why do it this way? First, one cable runs to the printer table instead of a medusa of cables. Second, the PixCut and the dye-subs are all USB 2.0, so a USB 2.0 hub has all the speed they need. Third, the hub's own power supply keeps the printers from drawing power through the iPad dock. That extra draw on the dock is a common cause of random disconnects and stability issues.
A common question in the group: "My recommended hub only has room for the iPad, power, one printer and my DSLR. Where does the PixCut go?" This layout fixes that. The camera stays on the dock, and every printer you add goes on the powered hub.
Prep your Liene printers first
- Before the event, connect each PixCut to an iPad over Bluetooth with the Liene printer app and update it to the latest firmware.
- Then "forget" the printer in Bluetooth, and from then on run it over USB only. Booth.Events doesn't support the PixCut over Bluetooth, AirPrint, network or Print.Events.
- Two of my three printers didn't need an update, but it's worth checking every new one.
Booth.Events configuration
Turn on USB printing (once per iPad)
- Update the Booth.Events app from the App Store.
- Go to Settings > Apps > Booth.Events and turn on "USB Printer Drivers."
- Restart the iPad.
- Launch the event, plug the printer into the hub, and add it from the printer list.
Sticker template and AI prompt
- Create a template using the 4x7" preset.
- Set the photo area to fill the full 4x7" template.
- Create an AI Prompt that generates the sticker sheet, then assign it to the template. This needs the Pro plan or higher.
- Assign the template to your event, and set the event's capture type to AI photos.
- Launch the event. Booth.Events works out the cut lines automatically, so guests get a sheet they can peel right away.
Printer settings
- Template selection: Turn on only the templates each printer should print. Sticker templates go to the PixCuts, and 4x6 or strip templates go to the dye-sub.
- Leave cut/double settings on Auto. They're detected from the loaded paper, and Manual can crop prints. After a paper change, the detection only updates on the next print.
- ICC profiles: DNP and Citizen use automatic profiles. HiTi needs the manufacturer's profile, uploaded under Devices > ICC Profiles on the web dashboard.
Running two (or more) printers
- You can connect several PixCut S1 printers through the hub, which really helps because the sticker printer is slow.
- Booth.Events spreads jobs automatically by session, not by sheet. If one session prints two sheets, both go to the same printer, and the next session goes to the next printer. You don't have to pick a printer.
- If a printer runs out of paper, the other printers pick up its jobs, and it rejoins once it's fixed.
- Your hub's capacity is the real limit, so test the full setup at home before the event. I've done two events so far with two PixCuts running.
My event workflow: use the 2-minute print to your advantage
A sticker sheet takes about two minutes to print and cut. Instead of making guests stand there waiting, I fill that time:
- Guests do the sticker session first.
- Then they do a 3-pose session with a 4x6 or strip, which prints right away on the dye-sub.
- They share their photos from the same booth.
- By the time they pick up their print, the sticker sheet is almost done, so they wait a lot less.
Sticker prompts that work
I started a sticker prompt sharing thread in the Booth.Events Community group. Post your output picture as a comment, then reply to yourself with the prompt. Here's what I've learned so far:
- Use digits, not words, for counts. "exactly 9 stickers" worked when "nine" didn't. The same goes for one big single sticker: use "1."
- Say that everything must stay in frame. Spell out that every sticker is fully visible and none are cropped or cut off at the edge. This fixes the "half a sticker" problem.
- Lock in faces. Tell it to keep each face exactly as it appears (bone structure, eye spacing, nose, jawline), keep the same number of people, and keep their arrangement.
- Branding and logos: In the booth bot, add your logo as photo 2, and in the prompt tell it to use "the exact logo from the second image unaltered" as the header or in a corner of each sticker.
- Personalize the header: Swap the header text for a dynamic guest-name element.
Here's my wedding prompt as a starting point:
The entire image is a unified artwork of a 90s puff-style sticker sheet on a flat, solid white background. The shot is framed perfectly head-on from directly above, presenting the sheet completely flat to the camera in a vertical portrait layout. The composition is carefully framed so that every single sticker is completely visible and fully contained within the image borders — no stickers are cropped, cut off, or partially out of frame. At the top of the sheet is a large, wide glossy puff sticker acting as a header, featuring the text Congrats Newlyweds written in a silver and gold wedding-specific font. Below the header, the sheet features multiple die-cut puff character stickers arranged in a dense, perfectly neat, symmetrical vertical grid filling the rest of the area. The empty spaces between the character stickers are filled with tiny, matching puff stickers of hearts, wedding decorations, and pieces of Heart shaped candy. The subject from the first image appears as several different stickers in various playful wedding guest poses and costumes, like as the ring bearer or giving a speech. If there is one subject, they appear in all the character stickers. If there are multiple subjects, each person appears across the stickers, the number of people is unchanged, and their relative arrangement is preserved. Every person's face is preserved exactly as it appears in the first image: the bone structure — eye spacing, nose, jawline, cheekbones — is identical, and the expression is carried into the scene exactly as it appears, not altered, softened, or idealized. The aesthetic is authentic 90s puff stickers with a thick, glossy, embossed plastic texture, white die-cut borders, and vibrant wedding colors. Flat, bright studio lighting highlights the raised, glossy texture of the stickers against the white background.
Troubleshooting checklist
- Printer or "USB Printer Drivers" switch doesn't show up: Restart the iPad, confirm it has an M-series chip and iPadOS 18.4+, update Booth.Events, and check that the printer is on the supported list.
- Prints in LumaBooth or Curator but not Booth.Events: Only one app can use the USB printer at a time. Turn off the other apps' USB printer drivers in iPad Settings, turn on Booth.Events' driver, then power the iPad off and on.
- Isolate the hub: Plug the printer straight into the iPad. If it shows up that way, the hub or dock is the problem. Next, swap the USB cable and the dock.
- Keeps disconnecting: It's almost always the hub or the power. Use a powered hub and an adapter of at least 45W (60W+ is better).
- Still stuck: Delete and reinstall Booth.Events, or unplug and replug the printer while the Add Printer screen is open.
- Wrong colors: Upload and select the right ICC profile for your printer and paper.
Official Booth.Events guides
- How to do peel-and-stick sticker activations
- Direct USB printing
- Troubleshooting direct USB printing
- Booth.Events Community Facebook group
Try it yourself
If you're not on Booth.Events yet, try Booth.Events with my referral link. In central Iowa and want stickers at your event? Check out my live photo sticker station.
Need help getting your booth set up? Photo Booth Support has support memberships for booth operators, and I also do custom consulting for hardware, wiring and prompt setups.
Always test your full setup (iPad, dock, hub, printers and prompts) before an event. Hardware, app versions and supported printers change, so double-check the official Booth.Events guides above.
As an Amazon Associate I earn from qualifying purchases.